FergWorld : Articles : Flying the Bell Jetranger

By Ryan Ferguson
I began flying the Bell 206B in July of 2004, and published the first draft of this article in September of 2004. This article sums up my 'minimal' (<50 hours) experience with the aircraft so far, and as such the author begs the reader to excuse and subsequently report any inaccuracies to ryan@fergworld.com.
SECTIONS
HISTORY OF A LEGEND
 |
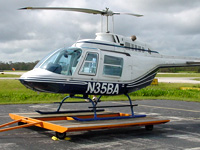 N35BA on the trailer - I landed it there, and you can tell because the helicopter is sitting just a tad aft on the pad. The aft portion of the skids should be about 12" further north.
 |
The Bell Jetranger is the most successful and popular light turbine helicopter ever built for the commercial market. Unless you've lived in a cave for the last forty years, you've undoubtedly seen, ridden in, or flown a Bell 206, aka the Jetranger. Its lines are so common that it defines our society's "generic" helicopter image.
A bit of history is in order. The Bell 206 started as a "failure" - only in the sense that it was rejected by the US Army after a competition for a new light observation helicopter in 1962. The Hughes 500 won that contract, but Bell quickly retooled the design for the civilian market, delivering the first 206A model in 1966. The original A-model featured an Allison C18A turbine engine, which developed 317shp.
In the early 1970s, Bell released the Model 206B Jetranger II which featured the Allison 250-C20 400shp turboshaft engine. In 1977 the Jetranger III, with the 250-C20B engine (420shp) was introduced. Other than a larger and improved tailrotor, little else was changed with the design. The 206B3 Jetranger III is the current production model and is now manufactured in Mirabel, Canada.
Incidentally, the 206, which won the US Army's "LOH 2nd Edition" competition in 1968, did end up in the Army's inventory, entering service as the OH-58A Kiowa. The Army continually improved the Kiowa, between 1980 and the mid 90s, culminating with the OH-58D Kiowa Warrior, which carried Hellfire missiles.
Over 7,700 Jetrangers had been delivered by 1995 -- by far the largest production run of any turbine helicopter!
GENERAL OVERVIEW OF THE BELL JETRANGER II (206B)
First things first. It's a great looking ship - clean lines, a form that follows function, comfortable seating for pilots and passengers, great visibility from the pilot station. Its footprint is small enough that the helicopter can easily be tucked away in a hangar or corner of the ramp. Pre-flight and maintenance access to the engine, transmission, and associated components is quick and direct. This is a working helicopter, and clearly Bell designed a helicopter which is economical, safe, and easy to operate.
General operating weights: empty weight is about 1700 lbs. for most 206Bs, and maximum gross weight is 3200 lbs. When carrying external loads (this doesn't happen often,) the maximum gross weight is 3350 lbs.
Useful load is approximately 1500 lbs. With full fuel, that works out to approximately 630 lbs. for payload and crew. Consequently, most 206Bs are operated with 60 gallons of fuel (Jet A) or less to accomodate a greater load.
"Attempting to actuate the cyclic manually (sans hydraulics) is akin to moving a steel rod buried in concrete!"
The Allison 250-C20 produces 400shp, but the helicopter is power-limited by the transmission. Burning an average of 24 gallons per hour, and with a modified tank capacity of 96.7 gallons, the helicopter's endurance is approximately 3.5 hours. Originally the ship featured a 76 gallon capacity due to a fuel filler door design which precluded using the top quarter of the tank. The "tank extender" modification appears as a soda-can sized appendage on the right side of the helicopter, which raises the level to which the fuel can rise by approximately six inches, utilizing the entire fuel tank capacity.
The cyclic transmits blade pitch information via a single hydraulic system. The only backup to hydraulic pressure is pilot brute force to tilt the disc. This may be simulated by turning the hydraulic pump off via a switch on the center console. Attempting to actuate the cyclic manually (sans hydraulics) is akin to moving a steel rod buried in concrete! (Okay, not quite that bad - one can make control inputs with great effort, but the Bell AFM recommends a running landing rather than attempting to hover prior to setdown. Definitely an emergency situation!)
Many Jetrangers have been converted to "high skids" rather than the factory original low-skids. Today Bell offers either as an option, but most pilots prefer the high skids, which add approximately one foot to the helicopter's total height, and greatly increase the distance between the tail rotor's arc and the ground. This can be a critical difference if the pilot must make a downwind approach, or an autorotation from altitude.
PRE-FLIGHT INSPECTION
Pre-flight inspection of the 206B is straightforward. However, I don't have a personal copy of the AFM yet, and therefore can't thoroughly document the pre-flight at this time. Expect that soon.
ENGINE START
Since the Jetranger II is such a simple helicopter, for those of us making the leap from piston to turbine equipment, the most complicated systems-related task we're likely to face is learning how to start the engine!
Luckily, it's quite a simple process. However, the stakes involved are much higher than when starting most flat piston engines. To the point, it's perfectly possible to damage or completely destroy a turbine engine if the pilot botches the start procedure. A hot start (which, by the way, is not at all related to 'hot starting' a fuel-injected piston engine) occurs when the temperature inside the combustor exceeds a maximum allowable value. Just how hot is hot? Oh, a mere 927 degrees CELSIUS... that's 1700.6 degrees fahrenheit to you and me. More on hot starts in a minute.
Due to thermal stress and shock, engine startup puts more wear and tear on the turbine engine than any other (within limits) operation. Consequently, most operators count cycles on the engine, which is an excellent indicator of how the engine was treated in its lifetime. To many helicopter operators, cycles are more important than total hours, since helicopters tend to fly a greater number of shorter missions as compared to their siezed-wing counterparts.
|
* Item worth mentioning: prior to starting, it's important to look outside and verify the rotor blades are at a 90-ish degree angle to the longitudinal axis of the helicopter. It's not a good idea to start the engine with the blades north and south for two reasons:
- You won't know for a fact that the aft blade tie-down has been removed. (Tying down a semi-rigid system involves connecting only the aft blade to the tailboom.) Starting the engine with the blades held in place would be a Bad Thing.
- Due to the extremely hot exhaust gases rising from the engine exhaust, and the fact that the blades don't turn until approximately 25% N1 on startup, it's possible to burn one or both blades (depending on wind) while the power turbine is spinning up.
|
Also, quick rundown on turbine engines - the concept is simple! Compress the heck out of a parcel of air, heat it up in the process, then dump some fuel into the mix and light the candle. The fire roars continuously after you ignite it, creating exhaust gases which spin a power turbine. The power turbine conducts power to the main rotor disc via a gearbox employing planetary reduction gearing to bring the RPM down from tens of thousands of RPM to 400-500.
More detail: in a free turbine (turboshaft) engine like the Allison 250-C20, air is drawn through the engine inlet and compressed via a series of axial flow compressor stages, then flung outward via a centrifugal flow compressor and drawn into the combustor, which is nothing more than a "burner can" which is made to withstand the intense heat and pressures created by combustion. As the exhaust gases depart the combustor at incredible rates of speed, the compressor turbine turns (which, since it's connected via a spool, continues turning the compressor stages after the light off.) A small percentage of this exhaust gas continues past the compressor turbine to the power turbine, which is what turns the disc. There is no physical connection between the compressor turbine (which is connected via a spool to the compressor stages) and the power turbine - just the gas "path!"
There are several instruments to monitor these engine components. N1, or "gas producer," is the speed of the compressor measured in percentage RPM. (Just imagine trying to remember to set 25,550 RPM instead of a simple percentage amount!) In many turbine powered aircraft, N1 is used to set power, but in most helicopters a torque gauge is used instead. Torque, measured via a torquemeter, is the amount of torque applied to the transmission via the engine. There are torque limits which may not be exceeded, such as 85% maximum continuous torque, 100% for takeoff only (5 minutes maximum) and transient (unintentional) up to 110% torque will be tolerated for only 10 seconds or less. N2 is the speed of the power turbine, also measured in % RPM. and is regulated by the governor during normal flight operations - other than making minute adjustments with the governor beeper (located on the collective,) the pilot leaves this set at 100% all the time. Finally, TOT, which stands for Turbine Outlet Temperature, is used to monitor the temperature of the gases leaving the compressor turbine. TOT is essentially the same thing as EGT (and is even called such, occasionally) in piston helicopters. TOT is an extremely important gauge in turbine-powered aircraft, because most are limited either by maximum torque (achieved on colder days) or by the TOT (warmer days.) The TOT may not exceed certain values, which are typically time-limited (continous, 5 minutes, 10 seconds, and even <1 second.)
Phew! That was an extremely condensed explanation of how free turbine engines work - for more, I suggest you try Sellkirk College's page on Gas Turbine Engines. Of particular interest is the movie section at the bottom of the page, which features a brief explanation of the P&W PT-6 turboshaft engine, which is very similar in concept to the Allison 250-C20.
All right, on with the show! Pre-flight inspection complete, let's hop aboard and start 'er up. To do that you'll need to be familiar with...
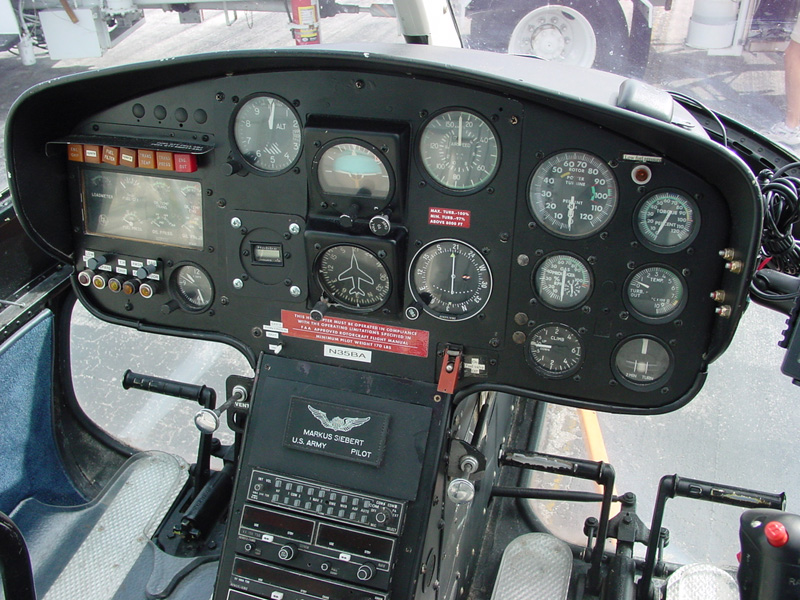
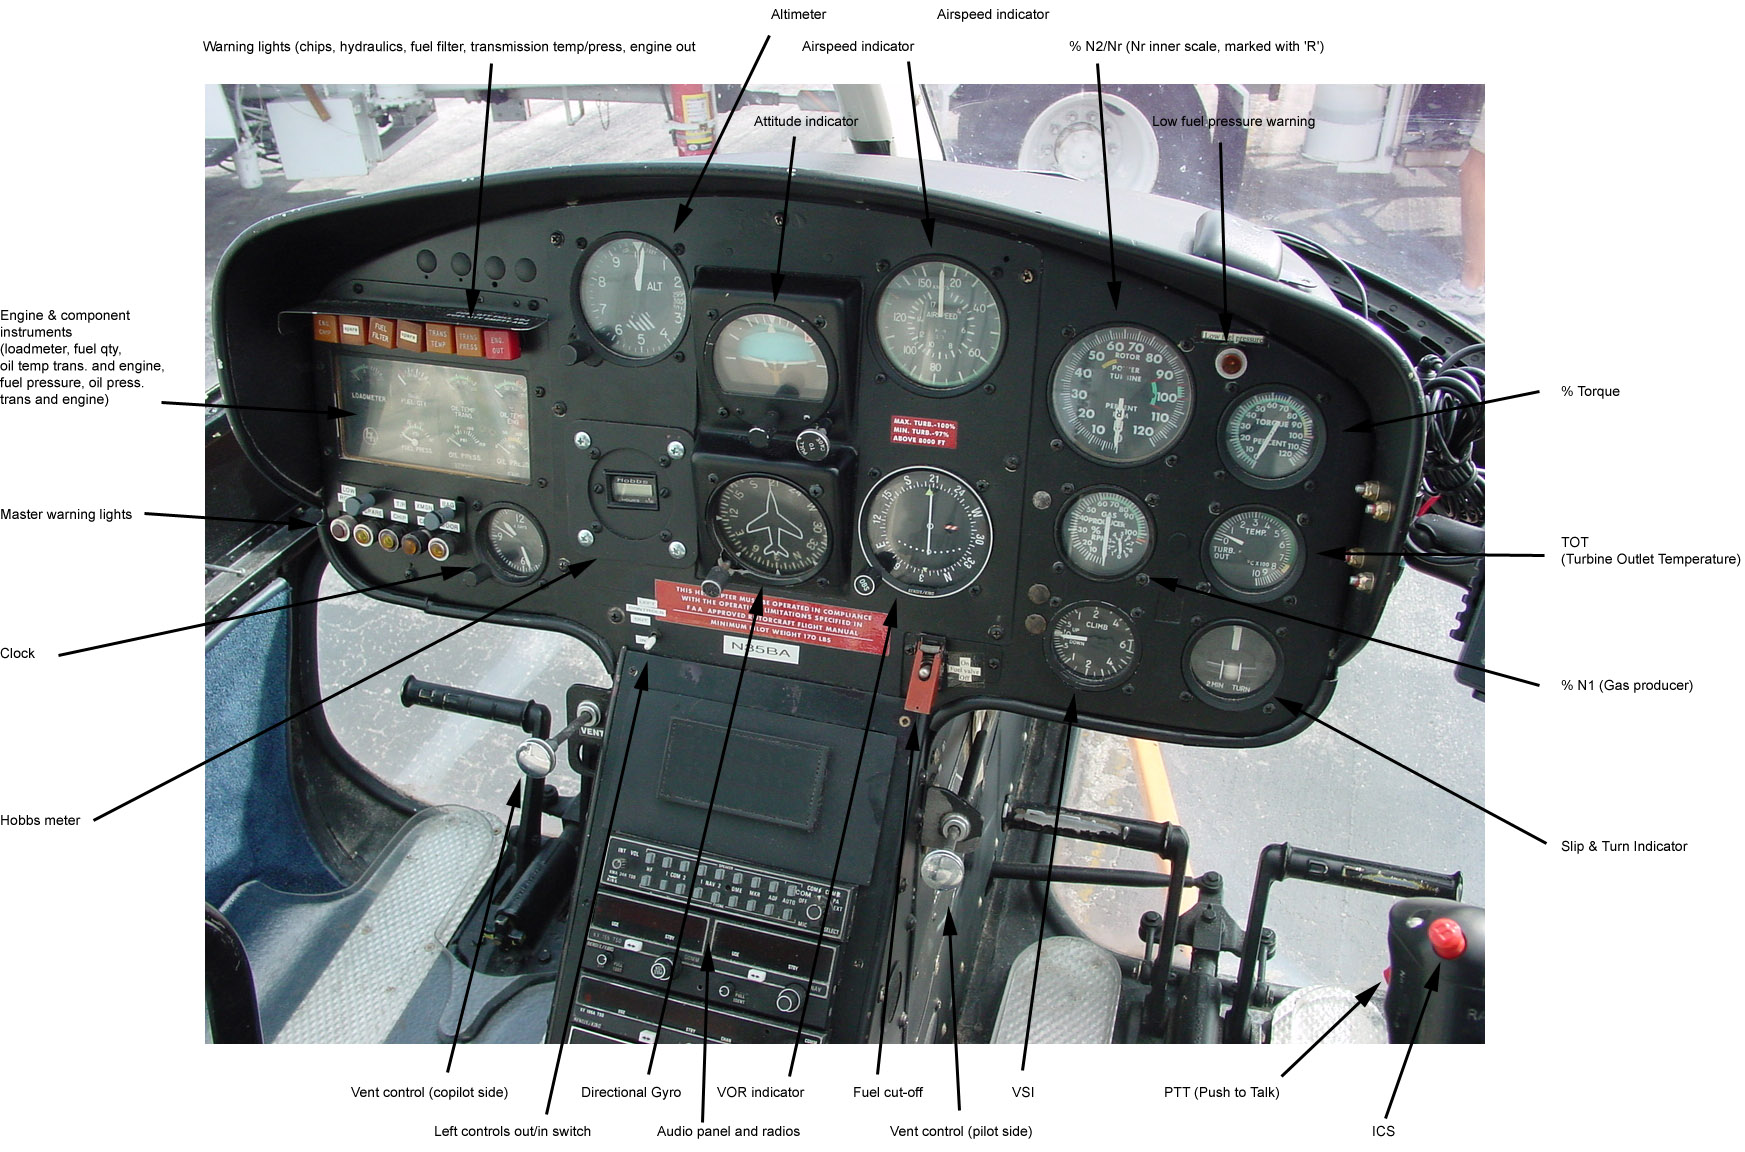
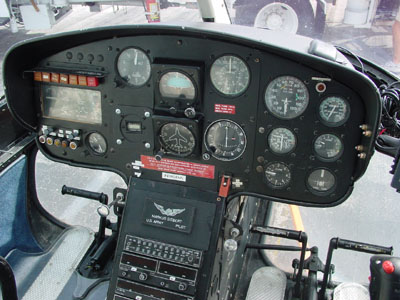 800x600 version | 1280x960 with each instrument identified
The Jetranger II's panel. Turbine instruments fill the top right quadrant; airspeed, heading, and altitude in the center; engine and transmission instruments, along with associated caution and warning lights, are on the left. Audio panel and radios are mounted in the center pedestal.
800x600 version | 1280x960 with each instrument identified
The Jetranger II's panel. Turbine instruments fill the top right quadrant; airspeed, heading, and altitude in the center; engine and transmission instruments, along with associated caution and warning lights, are on the left. Audio panel and radios are mounted in the center pedestal. |
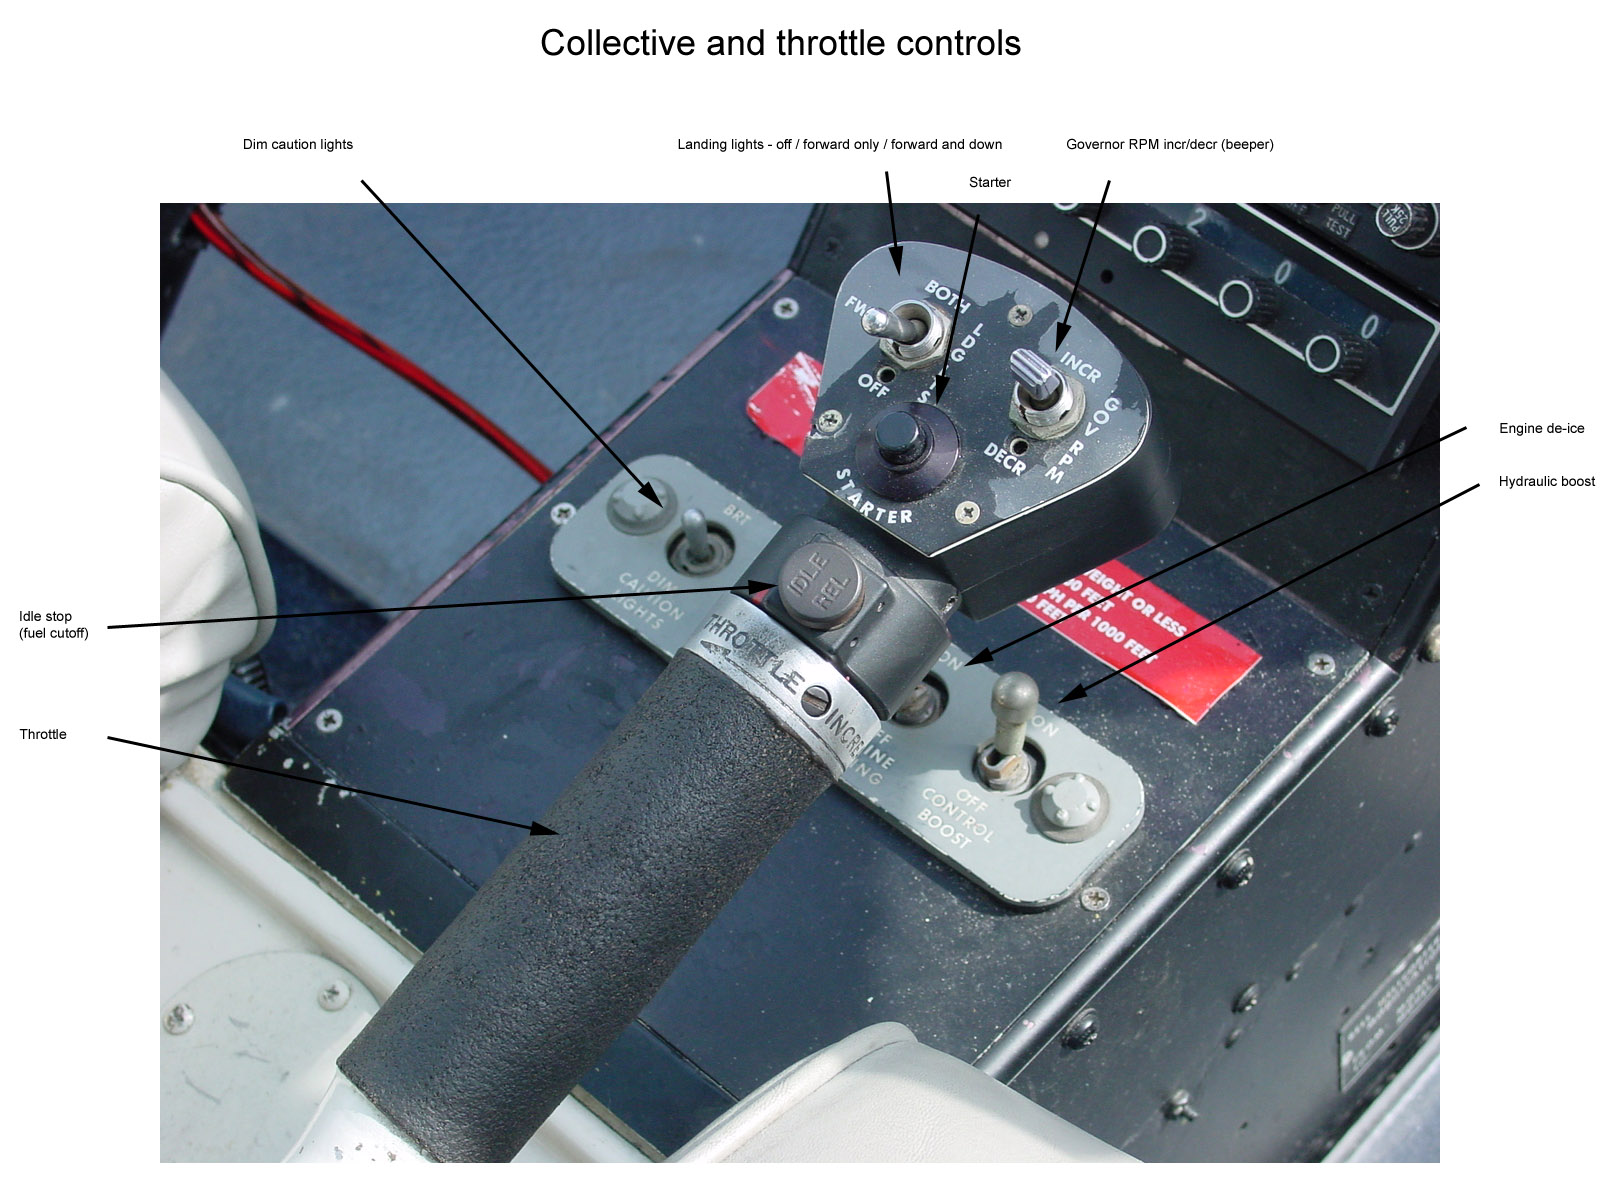
The preceding photos show you what you're working with to start the aircraft. After ensuring the blades are oriented east and west, setting the altimeter, checking freedom of movement on the flight controls, and verifying engine anti-ice off, hydraulics on, and fuel valve on, close the throttle fully past the idle release tab. To do this, you'll use your left thumb to depress the Idle Release button and roll the throttle fully to the closed position. It's a good idea to do this a few times prior to start just to make absolutely sure that the throttle is fully closed. Rolling the throttle on from the fully closed position, you'll feel a "click" as the release tab drops into place to prevent inadvertent total power reduction (which stops the flow of fuel to the combustor.) Push the tab back in with your thumb and roll the throttle fully closed again; now you're ready to continue.
The battery (master) switch is turned on (see the overhead panel composite detail.) While you're looking up, activate both the forward and aft fuel boost pumps. Next, the engine/transmission instrument cluster on the left side of the panel is scanned, and all caution/warning lights checked (press to test.) Verify the collective is fully down, clear the area, and prepare to push the starter button (see the collective detail.)
Before you do that, though, a very important check: look at the TOT (Turbine Outlet Temperature) gauge on the right side of the instrument panel (see the panel detail - TOT is on the lower right quadrant of the panel.) If you're starting the helicopter for the first flight of the day, the TOT should equal ambient temperature. If the helicopter has flown recently, however, TOT may range from 200-500 degrees Celsius. The TOT must, must be less than 150 degrees Celsius prior to introducing fuel into the combustor!
This does not mean the pilot is prohibited from starting the engine when the TOT is high - however, one must take great care to monitor both TOT and N1 during engine start. Essentially, when the pilot motors the starter, he is spinning the compressor via battery power and starter motor (the starter does double duty as a generator, later on.) The compressor draws cool air into the combustor and lowers the TOT significantly. Therefore, it is vitally important to verify that after motoring the starter, fuel is not introduced until both 15% N1 and <150 C TOT are achieved prior to rolling the throttle on past the idle cutoff tab.
Back to the procedure. Hold the starter button down and do not let go. Wait until 15% N1 and <150 C TOT, roll the throttle on until you feel the "click" of the idle release tab, and wait. What did you just do? The "throttle" (not an entirely appropriate term for turbine engines, but in helicopters we still call it such) is simply a fuel control, and by rolling it past the idle stop you've just start dumping fuel into a combustor filled with hot, compressed air and sparks flying from ignitors embedded in the can. (The ignitors essentially work much like sparkplugs, or more aptly, glowplugs in diesel engines.) We have fuel, we have air, we have spark - we have ignition! That's the howl you're hearing right now as the inferno grows, pressure builds, and exhaust gases start to flow past the compressor turbine.
|
|
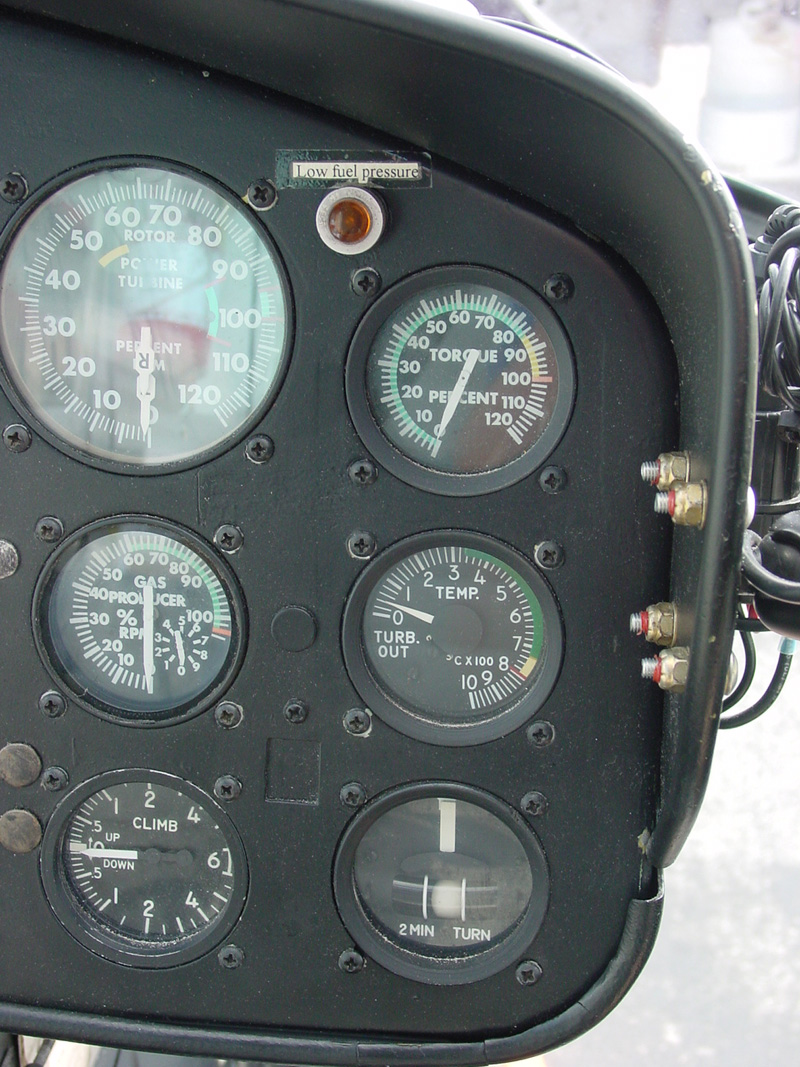
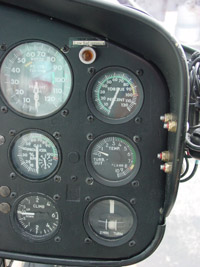 A detail of the four turbine instruments. Clockwise from top left: N2/Nr, Torque, TOT, and N1 (Gas Producer.) Note that the TOT registers ambient temperature - the turbine has been sitting dormant for some time. The two instruments on the bottom of the panel are VSI (left) and Turn and Slip Indicator (right.)
 |
All of your attention must now be centered on the TOT gauge. Very quickly it rises from the bottom of the green arc (0 C) towards the top (810 C.) Note that the TOT gauge will register up to 1000 degrees Celsius. You never want to see the needle there - it means you've toasted the engine and are probably about to go into serious debt!
The point of staring at the TOT gauge is to be ready to remove fuel from the process if the temperature exceeds 810 C for more than a few seconds. The limitations section of the 206B AFM states that the TOT must not range between 810 C and 927 C for more than 10 seconds maximum. The first time I started the helicopter, my heart raced as the TOT skyrocketed towards the top of the green arc. Over time, and with a small amount of experience, it becomes easier to anticipate where the temperature will settle. As long as fuel is introduced under 150 degrees C, and with a healthy battery, there should be no cause for a hot start. The temperature will climb to the top of the green arc and then drop slightly as it settles in the 600-700 degree range (depending on ambient temperature.)
If for any reason you believe a hot start is imminent, the procedure is to roll the throttle closed, past the idle stop (which requires pressing the idle release button with your thumb) while continuing to motor the starter! This last step cannot be overemphasized. Release the starter in such an instance, and you can be sure that the TOT will skyrocket... and with a disengaged starter, there's nothing you can do to stop it! Remember, the starter motors the compressor stages, which channel cool air through the combustor. There's literally an inferno inside the combustor can, and unless cool air keeps moving the exhaust gases out of the combuster, you'll fry the turbine.
You can't go wrong holding down the starter!
Now that we have light-off out of the way, we can monitor the rest of the process. We continue holding down the starter button, shifting our attention now to N1, which should continue rising during the entire start procedure. At 25% N1, the blades should start turning. Why the delay? Turbine engines take a while to spool up - first the compressor turbine has to increase RPM, the exhaust gases traveling through the compressor turbine to the power turbine (called the "PT" hereafter) must speed up, and finally, the PT itself has to start turning and transmitting power to the reduction gearbox (transmission.) Power changes in turbine engines take awhile.
Immediately after checking to see that the blades are turning check oil pressure in the instrument cluster on the left side of the panel. Glance back at %N1 and wait for 58%, which is where the 'green arc' begins - at this point you can release the starter, as the compressor stages and compressor turbine have achieved critical mass and can continue to accelerate without battery power.
Essentially, you're almost done. Wait one minute for temperatures to stabilize. (This is so components in the engine compartment can warm up; the engine itself generally doesn't require warm-up or cool-down periods, but its associated machinery does.) After one minute, smoothly increase power to 70% N1 and bring the generator online (it's on the overhead panel.) Cage the attitude gyro, activate power to the AI and DG, and flip the avionics master switch on. There's also a circuit breaker to reset here - the engine warning beeper. This is typically pulled from the prior shutdown, as otherwise the pilot must listen to an incessant beeping until the master is turned off.
Now the pilot may smoothly advance the throttle to 100% N2/Nr, (note: Nr just means rotor RPM; it should be married to N2) being careful not to exceed 30% torque in the process. This requires a very smooth, continuous throttle roll while monitoring the torque gauge.
When N2/Nr is at 100% RPM, you're done with the throttle. You may use the governor beeper (the incr/decr RPM toggle switch on the collective) to make slight adjustments to %N2. This need only be done occasionally as the governor 'drifts' only slightly over long periods of time, assuming it's properly adjusted and maintained.
|
* Verify your hydraulics by checking freedom of control movement prior to every pickup. |
Skids clear? Time to lift!
Flight Operations
| TOT |
Continuous: 738 C
5 minute takeoff: 810 C
Start and shutdown: <927 C (10 seconds maximum), >927, less than 1 second |
| Torque |
Maximum Continuous: 85%
Takeoff: 100% (5 minute limit)
Transient: 110% (unintentional; 5 second limit) |
Now that we're ready to lift, there are a few considerations before pulling pitch. First, are we heavy? Is it a hot day? The 206 is torque AND temperature limited. It's possible to overtorque and overtemp the engine in the course of normal operations. Those limitations are listed to the right.
Be careful on the pickup - you may not be able to pedal-turn to the left, or even necessarily maintain heading, if the helicopter is loaded to its maximum weight. Keep an eye (okay, half an eye) on the torque gauge while you lift. If you're getting close to 100% torque, you may need to give some power back to the main rotor system by releasing some left pedal, or even applying right pedal. This is one of many very good reason to clear the area prior to lifting the helicopter!
Feel free to use 100% torque, but treat your 10% over max takeoff torque safety margin as an "avoid at all costs" area of the torque curve. You'll also need need to monitor TOT - again, reference the table at right. Climbing right takeoffs are a good way to buy a little extra torque.
Cruise torque max is 85% continuous, but again, treat your engine kindly and cruise with no more than 70-75% power. "70 and 700" are good in moderately warm climates - that is, 70% torque and approximately 700 TOT. Remember, you tend to be torque-limited on colder days, and temperature-limited when the ambient temperatures climb.

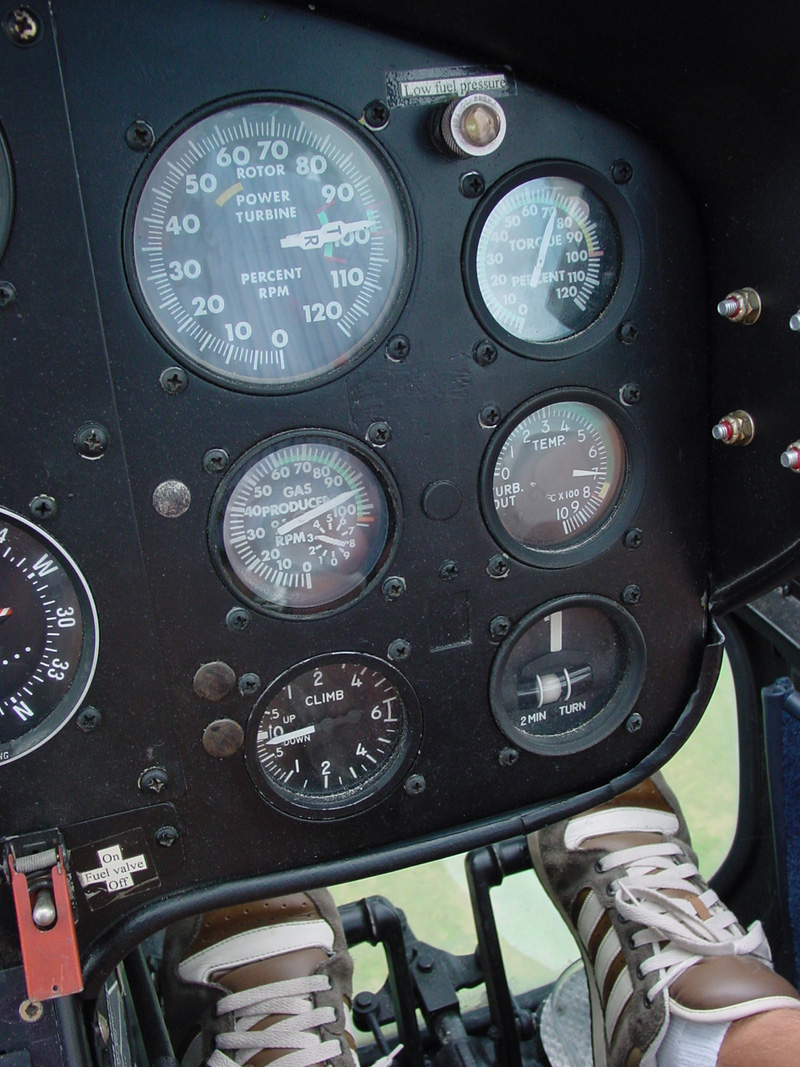
The indications of the engine instruments in cruise flight. Note that torque is set at 70% and the TOT has settled at approximately 700 degrees C. N2/Nr (top left) is always set at or close to 100% RPM, maintained by the governor. |
Approaching to land is another area in which the same principles apply. Pay careful attention to the wind, your approach speed, and your % torque. Be especially wary of a right crosswind component - as the helicopter decelerates through ETL and you pull additional pitch, you can peg the torque before you know it! Sometimes the best approach isn't always into a headwind component. Pick your path based on obstacles, keep your groundspeed on the slow side, and be ready to abort. Equally important is putting the helicopter down in such a way that you can climb back out with additional load, if you're dropping into a confined area to take on cargo or passengers. An example of this might be a downwind approach due to obstacles, but turning the helicopter into the wind for departure prior to setting the helicopter down on the spot.
Utility flying (powerline patrol), aerial tours, film work, and point-to-point transport are just a few of the many jobs at which this helicopter excels. It's a working aircraft; it can be operated profitably; it's safe, simple to maintain, and has customer appeal. For many helicopter pilots, the Bell 206 is the first helicopter they'll fly after paying their dues in smaller piston aircraft. It's a relatively forgiving machine, easy to learn and fly.
General flight characteristics: extremely stable for a helicopter. No trim; the hydraulics make it unnecessary. It took approximately half an hour of flying for me to adjust to the slightly phase lagged inputs in the cyclic to hover smoothly. In smaller sans-hydraulics piston helicopters, the cyclic's effect is instantaneous, but not so in the 206. This very slight lag is easily overcome with just a few minutes' experience.
Trailer landings, new to me, are fairly simple in the 206, with the caveat that with the pilot/copilot doors on, it becomes significantly more difficult. The reason for this is that the skids completely disappear from the pilot's view with the doors attached. A good technique for visualizing the skids is to visualize the pilot's knees as being parellel with the front tips of the skids. This means that the pilot has a sensation of hanging over the edge of the trailer when setting the helicopter down. This feels unusual at first, but of course the majority of the helicopter is aft of the pilot, so this is to be expected.
If the trailer consists of boards or some other segmented surface, the pilot should "count" boards on the side of the helicopter he's flying so he can place the skid squarely on the correct portion (laterally) of the trailer. This ensures that the other skid will also be in the proper location.
Abnormals and emergency procedures
Due to the robustness of systems in the 206 compared with piston ships, it's more unlikely that you'll ever face a true emergency in the helicopter. Luckily, even if you do, the helicopter's high rotor inertia convert engine failures into "normal approach" style autorotations. Hover autos are a nonevent - from the time the engine "fails" (assuming complete failure) to the time the helicopter finally lights on its skids is no less than approximately 5 seconds. I'd estimate that in the S-300CB, the time from failure to touchdown is closer to 1-2 seconds.
Skid-height in the hover is 5-6 feet as opposed to the S-300CB's 3 feet.
Autorotations from altitude are extremely benign. In fact, the descent gradient is so similar to a normal approach that passengers in the rear of the helicopter may not even be aware of a problem until the flare. The procedure here is typical of many other helicopters in its class - immediately lower the collective, apply right pedal, and pitch for sixty knots, which is a fairly level attitude. At approximately 30-40 feet, flare, level the helicopter, and prepapre for a hover auto from approximately 10-15 feet.
Failure of the single hydraulic system calls for a recommended running landing from the AFM. Although the helicopter is not easy to control with the hydraulics off, a running landing (at slow groundspeeds) should be reasonably safe.
Illumination of the engine or transmission chip detector, low fuel, or fuel filter warning lights calls for an immediate (but normal) landing.
Since I have not yet simulated tailrotor failures, I won't comment on them at this time.
CONCLUSION
The 206B is a wonderfully designed helicopter which excels in the roles for which it was created. It is simple, fun to fly, and an excellent "first" working helicopter for the professional rotor pilot.
I hope you've enjoyed this article. Please feel free to contact me with any questions or suggestions at ryan@fergworld.com. 
|

